(10). CALF RAISE
Standing Calf Raise Exercise – Complete Guide
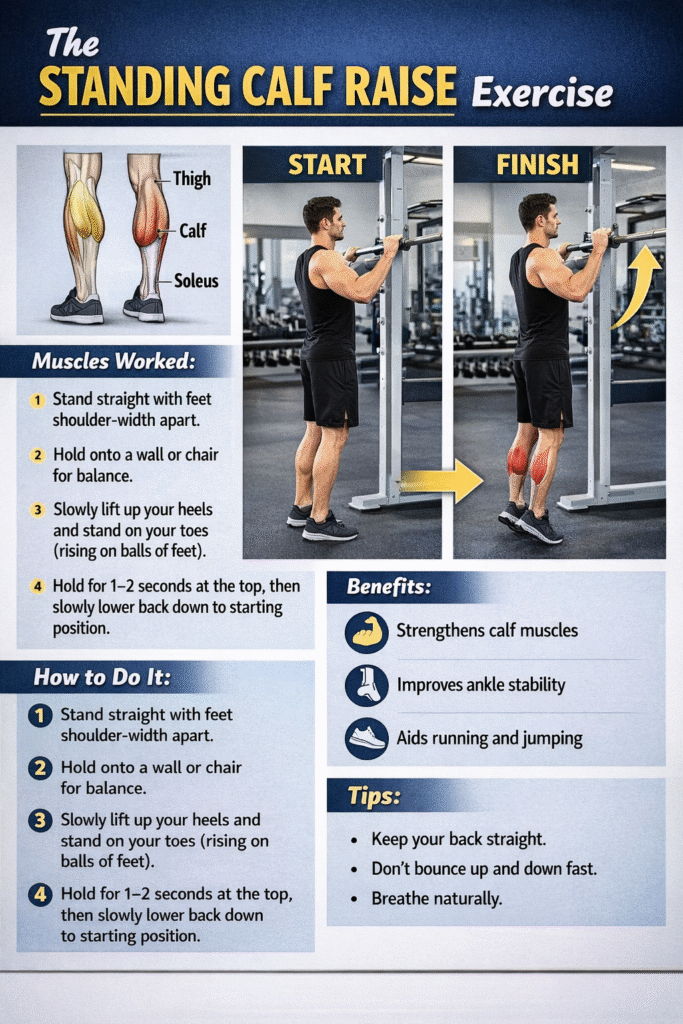
The Standing Calf Raise is one of the simplest and most effective exercises for strengthening the calf muscles. You can perform this exercise at home, on a school playground, or in the gym without any special equipment.
What Is the Standing Calf Raise?
The standing calf raise is a lower-body exercise that mainly targets the calf muscles (Gastrocnemius and Soleus). In this exercise, you lift your heels off the ground and balance on your toes.
How to Do the Standing Calf Raise (Step-by-Step)
- Stand straight with your feet shoulder-width apart
- Use a wall or chair for balance
- Slowly lift your heels and stand on your toes
- Hold this position for 1–2 seconds
- Slowly lower your heels back to the floor
Repetitions and Sets
- Beginners: 2–3 sets × 12–15 repetitions
- Intermediate: 3 sets × 15–20 repetitions
- Advanced: 4 sets × 20 repetitions
Benefits of Standing Calf Raise
- Builds strong and toned calf muscles
- Improves ankle strength and balance
- Helps with running, jumping, and sports activities
- Reduces the risk of leg injuries
Common Mistakes to Avoid
- Performing the exercise too fast or with jerky movements
- Not using a full range of motion
- Leaning too much forward or backward
Tips for Better Results
- Perform the exercise slowly and with control
- Keep your back straight and core tight
- Breathe normally
- Warm up before starting the exercise
Types of Standing Calf Raise
- Single-Leg Calf Raise
- Stair Calf Raise
- Weighted Standing Calf Raise
Conclusion
The Standing Calf Raise is a simple yet powerful exercise. When performed correctly and regularly, it strengthens the calf muscles, improves balance, and increases lower-body strength. Make sure to include this exercise in your daily workout routine.
(9). Shoulder Press
Shoulder Press Exercise – Complete Guide
The Shoulder Press is a highly effective exercise for building strong and well-shaped shoulder muscles. It also improves upper-body strength and posture. This exercise can be performed at the gym or at home with basic equipment.
What Is the Shoulder Press?
The shoulder press is an upper-body strength exercise that mainly targets the shoulder muscles (deltoids). It also engages the triceps and upper chest muscles.
How to Do the Shoulder Press (Step-by-Step)
- Stand upright or sit on a bench with your back straight
- Hold dumbbells or a barbell at shoulder height
- Exhale and press the weights upward
- Lift until your arms are almost straight (do not lock elbows)
- Slowly lower the weights back to shoulder level
Sets and Repetitions
- Beginners: 2–3 sets × 10–12 repetitions
- Intermediate: 3 sets × 12–15 repetitions
- Advanced: 4 sets × 15 repetitions
Benefits of Shoulder Press
- Builds strong and broad shoulders
- Increases arm and upper-body strength
- Improves posture and stability
- Helps with daily lifting activities
Common Mistakes to Avoid
- Using very heavy weights
- Arching the lower back excessively
- Performing the exercise too fast
- Locking the elbows at the top
Tips for Best Results
- Start with light weights and focus on form
- Keep your core tight and back straight
- Perform slow and controlled movements
- Always warm up before exercising
Types of Shoulder Press
- Dumbbell Shoulder Press
- Barbell Shoulder Press
- Seated Shoulder Press
- Arnold Press
Conclusion
The Shoulder Press is an excellent exercise for developing shoulder strength and upper-body power. When performed regularly with proper technique, it helps build balanced muscles and improves overall fitness. Include this exercise in your workout routine for best results.
(8). t- bar row
T-Bar Row Exercise – Complete Guide
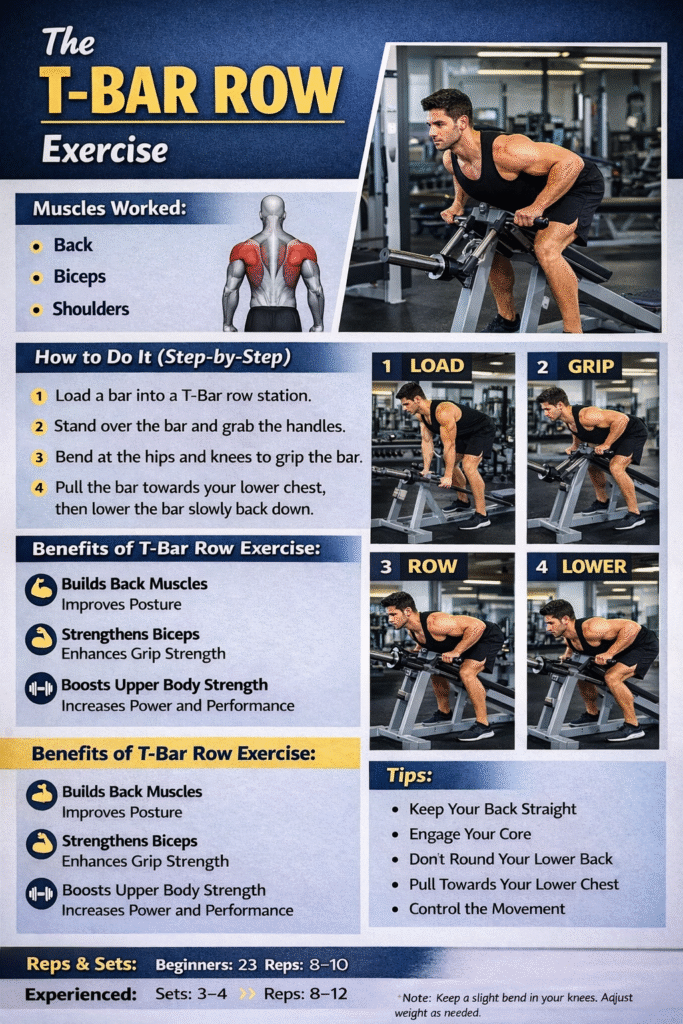
The T-Bar Row is a powerful back exercise that helps build thickness, strength, and muscle mass in the upper and middle back. It is commonly performed in the gym using a T-bar machine or a barbell setup.
What Is the T-Bar Row?
The T-bar row is a compound pulling exercise that mainly targets the latissimus dorsi (lats), rhomboids, and trapezius muscles. It also engages the biceps and core for stability.
How to Do the T-Bar Row (Step-by-Step)
- Stand on the T-bar platform or straddle the barbell
- Bend slightly at the knees and hips, keeping your back straight
- Grip the handles or bar with both hands
- Pull the weight toward your chest while squeezing your shoulder blades
- Pause briefly at the top
- Slowly lower the weight back to the starting position
Sets and Repetitions
- Beginners: 2–3 sets × 10–12 repetitions
- Intermediate: 3 sets × 12–15 repetitions
- Advanced: 4 sets × 8–12 repetitions
Benefits of T-Bar Row
- Builds thick and strong back muscles
- Improves posture and upper-body strength
- Enhances pulling power for other lifts
- Engages multiple muscle groups at once
Common Mistakes to Avoid
- Rounding the lower back
- Using excessive weight
- Jerking the weight instead of controlled movement
- Not squeezing the shoulder blades
Tips for Best Results
- Keep your chest up and spine neutral
- Use controlled and slow repetitions
- Focus on mind–muscle connection
- Warm up properly before lifting heavy
Variations of T-Bar Row
- Close-Grip T-Bar Row
- Wide-Grip T-Bar Row
- Landmine Row
Conclusion
The T-Bar Row is one of the best exercises for building a strong, thick back. When performed with proper form and consistency, it significantly improves strength, posture, and overall upper-body development. Add it to your back workout routine for maximum results.
(7). seated incline curl
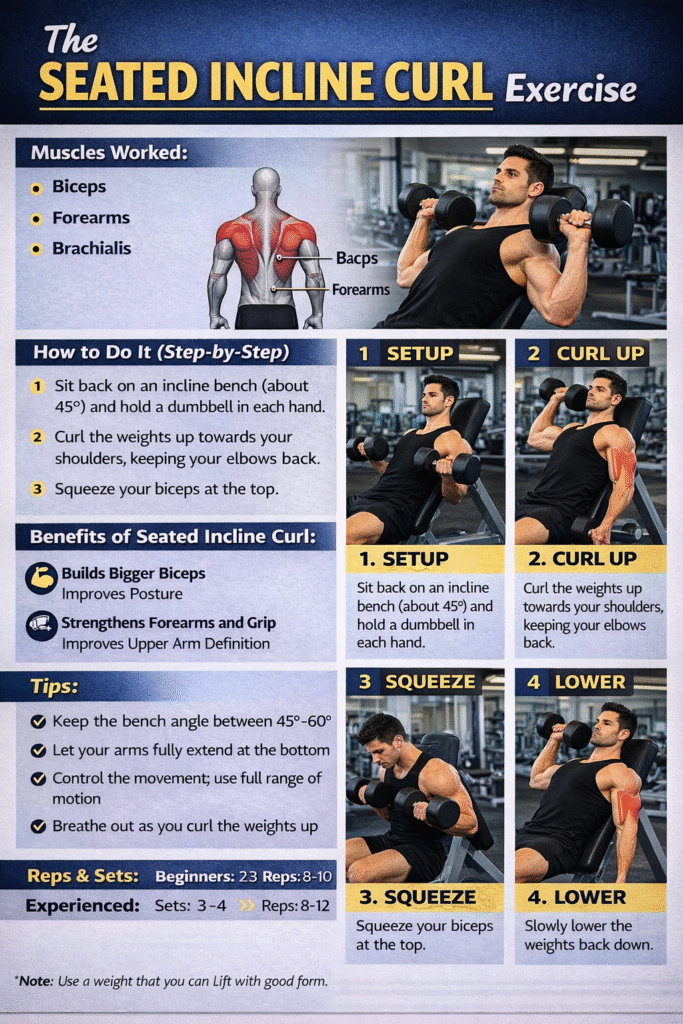
Seated Incline Curl Exercise – Complete Guide
The Seated Incline Curl is one of the best isolation exercises for building bigger and stronger biceps. By performing this movement on an incline bench, your biceps stay under constant tension, leading to better muscle growth and shape.
What Is the Seated Incline Curl?
The Seated Incline Curl is a biceps-focused strength training exercise performed while sitting on an incline bench, usually with dumbbells. The inclined position stretches the biceps more than regular curls, improving muscle activation.
Muscles Worked
- Biceps Brachii (main muscle)
- Brachialis
- Forearms (secondary support)
How to Do Seated Incline Curl (Step-by-Step)
- Set an incline bench at 45–60 degrees
- Sit back firmly with your back against the bench
- Hold a dumbbell in each hand, arms fully extended
- Curl the dumbbells upward while keeping elbows fixed
- Squeeze your biceps at the top
- Slowly lower the dumbbells back to the starting position
Reps and Sets
- Beginners: 2–3 sets × 10–12 reps
- Intermediate: 3 sets × 12–15 reps
- Advanced: 4 sets × 10–12 reps (controlled tempo)
Benefits of Seated Incline Curl
- Builds bigger and more defined biceps
- Improves arm strength
- Increases muscle stretch and activation
- Enhances overall arm aesthetics
- Reduces cheating compared to standing curls
Common Mistakes to Avoid
- Using too much weight
- Swinging the dumbbells
- Moving elbows forward
- Not controlling the lowering phase
Pro Tips for Better Results
- Use slow and controlled movements
- Keep your back pressed against the bench
- Exhale while lifting, inhale while lowering
- Focus on mind-muscle connection
Variations of Incline Curl
- Single-arm incline curl
- Hammer incline curl
- Alternating incline curl
Conclusion
The Seated Incline Curl is an excellent exercise for anyone looking to build strong, well-shaped biceps. When performed with proper form and consistency, it delivers outstanding arm-building results. Add it to your arm or upper-body workout routine for maximum gains.
(6). decline skull crusher
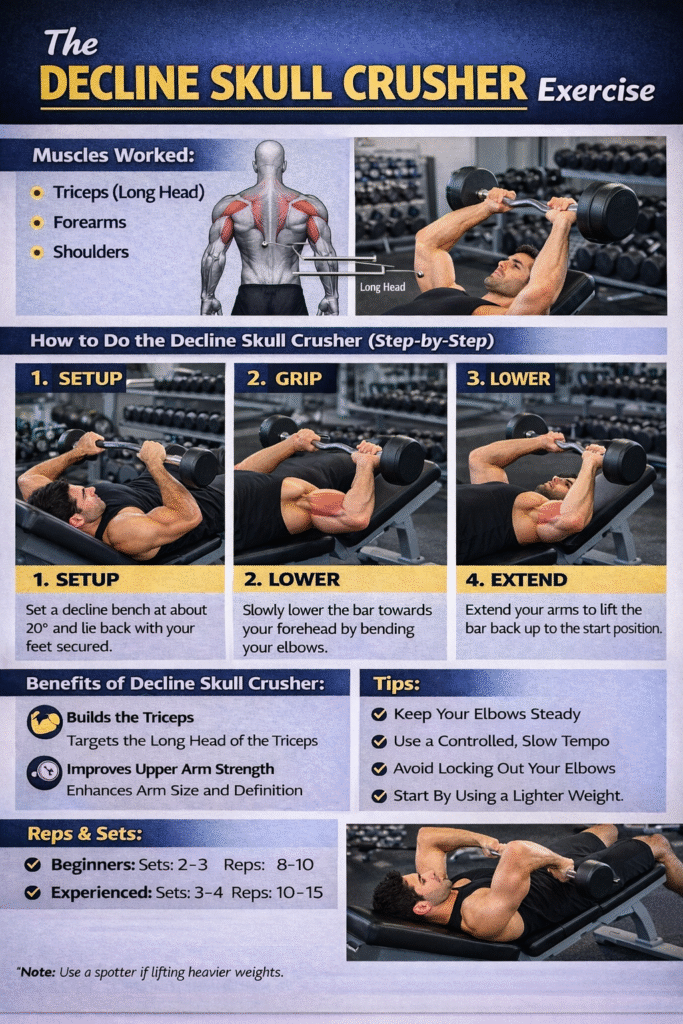
Decline Skull Crusher Exercise – Complete Guide
The Decline Skull Crusher is an effective isolation exercise for building strong and well-defined triceps. Performing this movement on a decline bench increases muscle activation and places greater emphasis on the long head of the triceps.
What Is the Decline Skull Crusher?
The decline skull crusher is a triceps-focused strength exercise performed on a decline bench using an EZ-bar or dumbbells. The decline angle increases resistance throughout the movement, helping improve triceps strength and size.
Muscles Worked
- Triceps Brachii (primary)
- Forearms (secondary support)
- Shoulders (stabilizers)
How to Do the Decline Skull Crusher (Step-by-Step)
- Lie down on a decline bench and secure your legs
- Hold an EZ-bar or dumbbells with arms extended above your chest
- Keep your upper arms fixed and elbows pointing upward
- Slowly lower the weight toward your forehead
- Pause briefly, then extend your arms back to the starting position
Sets and Repetitions
- Beginners: 2–3 sets × 10–12 repetitions
- Intermediate: 3 sets × 12–15 repetitions
- Advanced: 4 sets × 8–12 repetitions
Benefits of Decline Skull Crusher
- Builds strong and defined triceps
- Targets the long head of the triceps effectively
- Improves arm strength and pressing power
- Enhances overall upper-arm size
Common Mistakes to Avoid
- Using excessively heavy weight
- Allowing elbows to flare out
- Moving the upper arms during the lift
- Lowering the weight too fast
Tips for Best Results
- Use controlled and slow movements
- Keep elbows close and stable
- Focus on squeezing the triceps at the top
- Always warm up before heavy lifting
Variations of Skull Crusher
- Flat Bench Skull Crusher
- Incline Skull Crusher
- Dumbbell Skull Crusher
Conclusion
The Decline Skull Crusher is a powerful exercise for developing bigger and stronger triceps. With proper form and consistent training, it can significantly improve arm strength and muscle definition. Add this exercise to your triceps or push-day workout routine for best results.
Leave a Reply